
I’ll admit it: I’m a bit of a perfectionist when it comes to bindings, so here’s my quick tutorial for hand stitching the binding down to the back of the quilt. When I bind my quilts, I use a French- or double-fold binding. For a medium size quilt with a 3/8″ binding, I cut strips 2¼” wide, stitch them together with diagonal seams end to end, then fold the binding in half as I put it on the quilt, not beforehand with the iron. It really does fold over the edge of the quilt better if you don’t iron the binding in half before sewing it to the edge of the quilt.
I adjust the seam allowance when I sew the binding down with the machine so that when the binding is flipped to the back of the quilt, the folded edge just barely covers the bobbin thread, and the edge of the quilt fills the binding nicely without being bunched up and lumpy inside. I adjust the seam allowance, sew for 3-4″ and then flip it and check it on every single quilt because this setting can vary so much depending on the fabrics in the quilt and the binding and the batting used in the quilt. Even the weight of the thread can cause a variance in this setting from quilt to quilt.
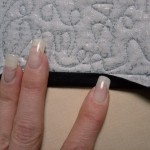
Once you’ve sewn the binding all the way around the quilt, flip the binding to the back of the quilt and secure temporarily with binding clips. The binding clips really do make the hand sewing easier. Thread your needle and knot the end of the thread; use a single thread, not a doubled thread. Secure the end of the thread under the binding in the edge of the back of the quilt where it won’t be seen.
To make these invisible hand stitches start by bringing the needle through just the backing and a bit of the batting, coming out just above the binding stitching line. Insert your needle into the very edge of the folded edge of the binding, and guide the needle through the fold for 1/8-1/4″. Guide the needle back out of the folded edge of the binding as shown:

Pull the needle and thread all the way through. Insert the needle into the back of the quilt, just above the binding stitching line and only through the backing and a bit of the backing. Guide the needle through the batting and backing next to the stitching line for 1/8-1/4″, and guide the needle back out of the back of the quilt as shown:

Pull the needle and thread all the way through until the binding lays flat against the back of the quilt. Repeat these two steps all the way around the quilt, and don’t forget to stitch down the corner miters for a more finished look. Here’s what the finished hand stitching should look like:

I’ve always thought this stitch was called a ladder stitch, but I could be wrong. If anyone knows differently, do share! What ever it’s called, it makes a wonderful nearly invisible stitch. I do recommend using a coordinating thread, but it almost doesn’t matter when the stitch is done right, since it hardly shows. Years ago I used 100# Silk from YLI to hand stitch bindings, but I found that it really wasn’t strong enough for this purpose for the long term, even though it completely disappeared into the fabric and you couldn’t even tell it was there.
I usually use Aurifil 50wt. Cotton Mako these days if I have the right color, otherwise I’m still using up all the Mettler 50wt. that I have left over from my “before Aurifil” days. The Aurifil thread is a 2 ply thread so it’s very fine, and the Mettler is 3 ply, and I have a bit more trouble with knotting with the Mettler.

I hope this helps you finish your quilts with great bindings! If you have any other tips to add to this, do share them here in the comments.

You might also like
 Shortcuts and Binding Relationships
 Inchie Addictions Take Shape
 Piping Hot Binding tool–I like it!
 Gifts from Japan
 Shortcuts and Binding Relationships
 Inchie Addictions Take Shape
 Piping Hot Binding tool–I like it!
 Gifts from Japan
That’s the stitch I use and I love it. I’ve always called it the Ladder stitch too. Since I’ve started using it I’m very proud of my bindings.
Nice tutorial.
Thanks Linda! It does make the best binding stitch, doesn’t it? This is also the stitch I use to close pillows or quilts made with the pillowcase method. It’s a little harder to do it neatly on a firmly stuffed pillow, but it still looks pretty nice. 🙂
Nadine,
Great tutorial .. your photos make it so easy. I’m definitely going to try this on one of the baby quilts I’m working on. I need the practice. I already folded and ironed my binding so hopefully it will be OK anyway.
Can I copy one of your photos to feature the tutorial on my site? Love the black fabric marking idea too, so will probably feature both at the same time.
Mich
It won’t matter that much if you’ve already folded the binding, but try it next time with the same stitching technique and see if it doesn’t make a difference.
Absolutely, you can use the pictures when you feature the tutorials. And thanks!
Thanks so much for this tutorial! I haven’t done a lot of hand-stitching so I snap up all the info about it that I can. 😀
Hi Judy–You’re welcome! Let me know how it works for you!
Pingback: How to Hand Stitch Binding Invisibly / Quilting Gallery
Thanks, I love this tip and I’ll try it on my next project. A binding can never be too perfect, can it? 🙂
I’m gonna link to you from my blog right away!
Hi Anna, and welcome! Thanks for visiting and for the link. Let me know how the hand stitching works for you on your next binding!
You did an excellent job on this tutorial. Your pictures are very clear and it’s well written. Thanks!
Thanks Dena!
Nicely done! That’s the way my Mema taught me to do binding. Now when people have questions, I will send them all your way!
Hi Corinnea! Aren’t Memas great? 🙂 Thanks for the lovely comments!
Nadine, what I should have said was that my Mema taught me everything EXCEPT don’t iron your binding in half first. Believe it or not, I have several quilts waiting to be bound (ha ha) and decided to try out your method/advice/genious on one. Perfection. I think it is the last key in the mystery of binding for me! Thanks so much!
Hey cool, we’ve found the missing link! 😀 Glad it worked for you Corinnea!
How brilliant! I’d never thought to not iron the binding in half, but I can see that would make a big difference. Can’t wait to finish my current quilt so I can use this binding method! Thanks for the tutorial, and for the thread tips, too. A fine thread would definitely be in order here.
Hi MissesStitches, and welcome! Yes, it really does make a difference. It may not be huge, but it’s there. Glad you liked the tutorial—come back and let me know how it goes with the binding!
Beautiful work! This technique can be used for applique as well – see Ami Simms book “Invisible Applique” — she also calls it a ladder stitch.
Now I have to finish my current quilt so that I can try it out.
Thanks for the clear photos/directons.
Hi Becky, and welcome! Yes, I agree, the ladder stitch works for hand appliqué too, and I have used it in the past. Do check back in and let me know how it works for you on your binding. Thanks for your kind compliments, and for stopping by!
Just pulled up this tutorial to help me do the binding on my quilt…….works wonderfully…..thanks so much for your help!!
Hi Barb, and welcome! I’m glad the tutorial was helpful to you!
Thank you so much for your wonderful tutorial on hand stitch binding. I am working on completing my first quilt for my daughter’s wedding. I was getting very frustrated on the finished look that I was getting. It became a struggle and I wanted to quit. I knew there had to be a better way and that is when I found your tutorial. Yes! What a relief! Your description and pictures are exactly what I needed. I am happy and having fun! Thank you so much! What a clean finish to all my hard work. I love it and I know my daughter will too. I look am looking forward to using this technique again.
Thank you and many blessings!
You’re more than welcome Darcy. I’m glad it helped you out!
Thank you so much for the tutorial. It was great. I have been looking for a nice way to stitch binding on my quilts and now have found it. No one has ever showed me a way to do it and have it look nice. Thanks so much for sharing.
You’re more than welcome Marilyn! Thanks for visiting.
Wish I had seen this before I started the binding on my quilt this weekend. I’m going to try it on the last couple of feet – I may just have to remove the last two night’s work and re-do it.
Hi Leslie! Thanks for your kind comments! I’m glad it helped, but I hope you don’t really have to take out what you’ve already done… 🙂
THANKS THIS SO HELPS CAN YOU TELL ME WHAT NEEDLES ARE BEST FOR DOING BINDING?
Hi Tiffany! I use straw needles, also sometimes called milliner’s needles, in a size 10 or 11. You could use an applique needle as well, but I like the longer straw needles. The size 11 is harder to thread, so if that causes an issue, use a 10.
Thanks so much for this tutorial…using the stitch now, and love the finish product!
This is just what I needed to finish my first quilt. Thank you so much for the detailed instructions. The photos really helped too.
You’re most welcome Nicole! I’m glad you found these instructions helpful. Congratulations on your first quilt, and welcome to the quilting addiction! 🙂
Just found this recently and used it for the FIRST time. Great trick….I do my bindings on the back by hand and this is the BEST. THANKS.
Hi Libby! I’m glad this method works well for you. Thanks for stopping by!
I’m just dropping in to make sure I’m going to do my binding correctly. I worked SO hard on this quilt and through moving and college haven’t gotten to the binding yet. I had it long arm quilted by a professional because I didn’t want my first attempt to be on an epic quilt top I put so much hand work into. I thought this stitch was called the “blind stitch” a family friend when I was young and my Grandma taught it to me for pillows/anything stuffed. lol I’m just freaked out that I won’t make an even stitch by hand without the guidelines of an evenweave fabric like my cross stitching. 😛
Thanks for these instructions. Just finished my first quilt and now I’m ready to work on the binding. Just wondering how long a needle to choose. I have a package of needles that are varying lengths. Some also seem a little heavier than others. Is there a way to prevent getting sore fingertips when hand sewing? My friend who quilts says everyone gets sore fingertips. I’m dreading it already.
Hi Gloria and Welcome! Sorry for the delay. I suggest using a very thin needle, like a straw or appliqué needle. As for the sore fingers, just try not to overdo; doing just a bit of the binding every day will get it done, but not leave your fingers tender. And your friend may have been talking about actual hand quilting, not just sewing a binding down. 🙂
Hi,
I was googling and found your tut on hand sewing the binding. It is so fast and easy and just bookmarked it for future reference. Thank you so much.
Wow. Thank you. I found you on Google search engine and am so thank you. I just learned to hand stitch and needed to finish with a hand stitched binding and you saved my day. I put picture of your hand doing the stitches on my wallpaper and used it to make sure I did everything correctly.
Hi Joanz! I’m so glad this post was helpful! 🙂
Beautiful! Thanks for the binding tutorial! I do the same thing, but it’s always good to see an actual guide for it. And I usually use quilting thread, but will change to Aurfil..I love that thread,. It’s great for piecing projects too.
If a jobs worth doing…it’s worth doing it right! I’d say you did it right!
Have a great week!
Hugs Marg.
Pingback: Binding-how about it? - Lori East Quilts
Till now I was doing an awful Job hand biding my quilt thank you so much thanks to you I can do an invisible biding I love you you rock. Love Pat
I just want to send you a big thank for this tutorial. Your instructions along with clear pictures couldn’t be any better. I have put it in application right away on my big quilt and so happy the way it turned out. No more fear with binding from now on. Thank you so much!
Hello Nadine, I just saw a neat technique and thought about you and would like to share it with you and other quilters of interest. Miter binding by Ricky Tim on You Tube. I thought if we combine his technique and yours we’ll get a perfect binding every time. Sincerely!